Tuesday, December 27, 2011

Christmas Wellingtons and Light...

Happy third day of Christmas!  It’s the day of three French hens…you do know the song don’t you?? The “Twelve Days of Christmas”, is a fun song, but perhaps you didn’t realize that the twelve days of Christmas happen AFTER Christmas…Not before like so many retail stores have been advertising. The twelve days of Christmas start with Christmas day (1st day) and go through the 5th of January (the twelfth night). You see, Christmas does not end on the 25th of December…it BEGINS on December 25th!!! We have just started celebrating at our house. Tradition has it that the, “Twelve Days of Christmas”, song was written as a way for young Catholic children to learn and or remember the tenets of the faith in the 16th century when it was against English law to even BE Catholic. The symbolism is fun to think about and it makes me love the song even more thinking about it as a mnemonic device. So here’s to Faith, Hope, and Love…the meaning of the third day of Christmas.
Awww...bet you’ll now be humming…..;-)

I hope all of you had a Merry Christmas day. I love Christmas day, but even more, I LOVE Christmas Eve!!! It is always a full day, but the culminating moment comes at the 9:00 o’clock candlelight service at church. This year was very special for me. The service always begins with the White Christ Candle being brought down the main sanctuary aisle. This year, a Down Syndrome teen of our church was the acolyte chosen for this honor. Having this young man in his long, white robe walking down the dimly lit aisle so reverently, brought such emotion within me, I momentarily lost my breath. It wouldn’t have been a problem, but I was to help start a chant from the back balcony of the sanctuary during this procession. This particular moment was MY present for Christmas…truly…Christmas made visible to me.


“The Light shines in the darkness, and the darkness has not overcome it.”

Light…it is a wondrous thing.

So when thinking about my recipe this week, I decided to share with you a “Light “ version of “No Beef” Wellington that we had for our Christmas celebration meal. It is soooo yummy and a real celebration entrée.

Christmas Wellington Recipe:
(4 to 5 servings)
Prep:
The day BEFORE making Christmas Wellingtons…place one 17.3 oz package of sheet puff pastry in the refrigerator to thaw. (1 package makes 4 to 5 servings) Thaw the 10 oz. box of spinach in the refrigerator as well.

Day of…
(So you only have to clean the bowl of food processor once…prep the dry ingredients needed for the filling first)

Grind in processor walnuts…you will need 2/3 cup finely ground
Set aside nuts.
Grind fresh breadcrumbs from a firm bread…we had a heel of a whole grain left. Go figure…use stale bread to make fresh bread crumbs….heheee.
You will need 2/3 cup finely ground breadcrumbs.
Set aside breadcrumbs.


Wellington Pate`
2 T. of oil
(I used walnut oil because it was Christmas and walnuts were being used in the pate` filling)
8 oz. of sliced mushrooms
(Your choice…I used baby bellas because they were on sale;-))


Heat the oil on medium high heat and sauté the mushrooms until they are golden and caramelized. Place mushrooms in bowl of food processor.


1 T. of oil
1 chopped medium onion
2 sliced cloves of garlic

In the same skillet used for mushrooms, sauté onions and garlic until both are soft and translucent.


1 10 oz. box of frozen spinach


Thoroughly squeeze the thawed spinach dry. Wrap spinach in toweling and really wring it dry.


Place onions, garlic, dry spinach all in the bowl of the processor with the mushrooms. Process the veggies until they are finely chopped and paste-like.

Transfer filling to a large bowl and add:

1 tsp. Herbes de Provence
(An herb blend that usually contains: savory, fennel, basil, thyme,
and lavender)
½ tsp. onion salt
½ tsp. of kosher salt
¼ tsp. of black pepper
¼ cup vegan cream cheese
2/3 cup finely ground walnuts
2/3 cup finely ground breadcrumbs


Chill filling for 1 hour

Pre-heat oven to 400 degrees

Veggie Burger Prep:

¼ canola oil
4 to 5 Frozen Veggie Patties - servings of this recipe
(Amy’s Quarter Pound Veggie Burgers)
Onion salt
Black pepper
Garlic powder

Heat a non-stick skillet with the canola oil on medium high heat.
Brown patties (no need to thaw)


Flip after browning first side and season with a sprinkling of onion salt, pepper, and garlic powder. Continue until all patties are browned on both sides. Set aside while preparing the puff pastry.


Two sheets of puff pastry are in the box. The pastry will be well thawed if you defrosted it the day before in the refrigerator. You can defrost on the counter the day of, but the pastry can become soggy when defrosting at room temperature. When the puff pastry warms too much, it can become difficult to work with...soooo...plan to do this defrost in the refrigerator and thus less difficulty opening the folds of the pastry.


Dust counter with unbleached all purpose flour. Open the folded two sheets of pastry and line up the two sheets of pastry together to make one long sheet of pastry. Slice from short edge to short edge of pastry to make 4 or 5 equally wide strips across the length of the pastry. Working with one strip at a time… Roll with rolling pin to lengthen and widen each strip to enclose the veggie patty and filling…use one of the veggie patties to measure the first strip to see how much rolling you need to do. When the strip of pastry is longer and wider….place 1/3 (heaping) cup of the mushroom/spinach pate` on the center of the pastry. Top pate` filling with a browned veggie patty.


There should be an overlap of the pastry dough and this extra dough can be trimmed and used for a decorative add on to the top…just wait…you will see!!!
Using a bit of water on your finger, seal the seams of the dough to completely enclose the filling and patty.


Flip the package over so the seam is on the bottom. Fold the rectangular ends under too, so that the package is now round.
Gather the scraps from trimming the pastry package. Roll out enough to accommodate a small cutout. I used a small snowflake cookie cutter, but you can use whatever shape you might have for decorating the top.


Wet the back of the cutout and place on the top of the smooth pastry package.


Continue the process until all packages are formed. Place the pastry packages on a parchment lined baking sheet. Gently and lightly, brush each package top with soy creamer…this will help to develop a golden color.


Bake Christmas Wellingtons for 45 minutes in a 400 degree oven. This allows the pastry to become golden and the patty and pate` to be hot inside the yummy package.
Remove Wellingtons from oven and serve.


Wonderfully delicious….Really!!!! 

I served these with steamed asparagus with a warm, cranberry,
 balsamic vinaigrette, and roasted butternut squash. 
Can we just say…CELEBRATION!!!


A fire was going in the fireplace, candles lit on the table…


...the room felt special.

My eyes during our meal were drawn to the glass stars on either side of our advent wreath…flickering almost like real stars. It was mesmerizing….


I thought about how we naturally are drawn to light… sunshine, firelight, candles, tree lights…I even have this glass cube that is full of lights that sits on my kitchen counter during Christmas. I stare at it while I cook….


Light is a word that we use as a noun…an object that brings visibility.
Light is also used as a verb…an action of making light…like to light a fire
Light is also used as an adjective...a light room or in describing a color.
Light is also used as an adverb…how one travels…
(I wish I could travel light – I am a big suitcase kind of girl)

Light can be used in all parts of our speech, yes, but light filters into all areas of how we communicate and how we live. Light IS special!!! Light illumines our lives and something draws us to that light. All of us are drawn to light. We just feel safer in the light. 

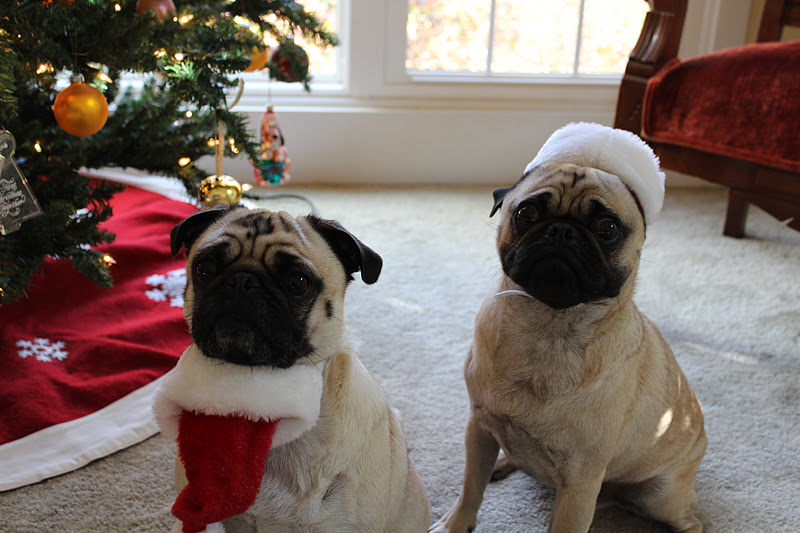
Even my little pugs follow the sunlight around the room to bask in its warmth.


Yes, my word for this week of Christmastide is Light. May the Light of Christmas bring warmth and illumination to each of you. It has been a difficult week for many, but today is the third day of Christmas and so, I remind each of you that Three French Hens tell us of: Faith, Hope, and Love…and the greatest of these is LOVE. As our Will sat in the sun and the light bathed him in December Light…his eyes said it all. Love leads us to the LIGHT!!


Light...it IS wondrous!!


Thoughtful living moment today: Even the smallest glimmer of light dispels darkness and rids the heart of fear. Whatever YOUR darkness...Fear not...
The Light Has Come!


Monday, December 19, 2011

Christstollen Calzone and LOVE

Wow…it is the week of Christmas 2011!!! It is a busy week for sure, but SO fun. For several weeks we have been having practices with the young elementary children for the church Christmas pageant. It is always so fun and it is always a "made for TV moment" on Christmas Eve. I always sit with the “animals”. This includes sheep and cows. They are mostly Kindergarten and 1st grade boys. (Can I just whisper…type casting!!) They cannot sit still and they definitely make smells. They are in a constant state of wriggling, punching, poking and bumping, but they can sure baaaaa and mooooo on cue! I have always had a tender spot in my heart for little boys and sheep…Baaaaa!!!!


I guess because I have been sitting on the floor in front of the stage, I have been seeing a wonderful view looking up to the stable where the manger of hay is center stage. I love the words swaddling clothes...(without all of the theological foreshadowing stuff). I just love the idea of a newborn baby all wrapped in cloth as a way of providing warmth, comfort and security. It represents an act of love. I don’t have an actual picture of my little animals making their Saturday night appearance....wish I did, but I would have needed too many mama permission slips. Yikes!! Here, though, is one of my Nativities.  I made it twenty some years ago. As I placed the figures, I thought about a baby all wrapped in white cloth in the midst of hay and lots of sheep. I thought about a new scared mother, totally in love with her newborn child. I sighed.....such love!


In thinking…as I do… the question came to my mind…what food most represents love to me???? Answer...BREAD! We have all heard “bread is life”. So...Life is given by God…God is love… Especially shown in the gift of His Son that first Christmas…This tiny babe we now celebrate... AND…bread from early in our human history has had a sacred connection...Holy Communion, Passover Matzah…So…on this special week of Christmas, I made a Christmas bread. Sorry, how my mind works.... All my little animals helped inspire this recipe. I created a Christstollen Calzone. Most Christmas stollen are flavored sweetly. They usually contain dried fruits and marzipan. My recipe is a savory stollen...more sheep and cow like...I thought more like a calzone, but with the shape of a classic stollen and using the inspiration of the season of Christmas. I have made the dough “red” in color and with the green gooey filling….ummmm….can we just say CHRISTMAS!! Don’t be afraid of yeast dough! This is not a finicky dough…easily put together and sooo worth the extra effort. I mean, what is better than the smell of baking bread…NOTHING!! A gift of Christmas!!! You can make this before or after Christmas. Make this when everyone is ready for pizza, but hey…it’s a special time...so make a Christmas Stollen Calzone instead! Special!!!

Christstollen Calzone Recipe:
1 cup water…should be warm to touch
(I usually use an instant read thermometer and like it to be about 110 degrees)
Add to water:
1 package of dry rapid rise yeast
2 tsp. of natural sugar
Stir to mix and allow to “Just be” for 5 minutes or so…


 Look at how good the yeast is...lots of foam!

In a large bowl whisk together the dry ingredients:

1 ½ cups all purpose unbleached flour
¾ cup whole-wheat flour
¼ cup vital wheat gluten
1 tsp. garlic powder
1 tsp. of kosher salt
2 tsp. of dried basil (or oregano if you prefer)
¼ tsp. freshly ground pepper


Add ½ cup of your favorite marinara sauce to the water and yeast…stir well.


Make a well in the center of the flour and add:
2 T. of extra virgin olive oil
all of the yeast, and marinara liquid.


Stir well. The dough will be soft and ready to turn out onto the counter to knead.


Dust the counter with all purpose flour and begin kneading the dough, pushing and turning with the heels of your palms. Add more flour as needed (could be up to ½ to ¾ cup more of flour). The dough will become shiny and elastic. This takes about 10 minutes. You can also do this in a stand mixer with a dough hook, but I just love to knead dough by hand!! Form the dough into a ball. Put 1 T. of olive oil in a bowl and place the kneaded ball of dough in the oil. Roll the ball over so that the oiled bottom is now up and on top.


Cover dough and place in a warm place to rise. It will need to double in size. The time it takes depends on the temp where the dough is rising. At least an hour or two will be needed.

While dough is rising make the filling:

1 (8 oz.) package of frozen spinach - thawed
(chopped) – I could only get leaf…the store was all out for all the spinach dip being made I guess hehe!!  Just chop after thawing and it works just as well. To quick thaw from a frozen state – open paper box and place on a plate. Place opened box in the microwave and cook on high for 2 minutes. Leave it in the microwave until the spinach is cool to the touch. Squeeze out the water and place in several layers of toweling. Allow this to absorb any additional moisture)


While the spinach is drying out... take...

7 oz. of extra firm tofu – ½ of the standard 14 oz. package


(Wrap tofu in toweling. Place on plate and cover with another plate or I used a small cutting board. Weight the plate with a heavy can…I used some beans. This pressing takes out some of the moisture in the water packed tofu)


Chop up an 8 oz. package of baby bella mushrooms. Place in a hot skillet with 2 T. of extra virgin olive oil. Sauté until golden and then add 1 T. of fresh thyme leaves. Add 2 green onions chopped and 1 clove of garlic chopped. The pan will become dry… keep moving around the veggies. Then, deglaze with 2 T. of white wine, or veggie broth. Allow all of this to cook until the liquid is again evaporated. Add a bit of salt and pepper at this point. Wait to season...until the mushrooms have browned. Salting before the mushrooms are seared, causes the mushrooms to release too much liquid and they will stew, rather than brown.

(This is all about building layers of flavor)


Place all in a large bowl:

Dry chopped spinach
Pressed tofu (crumble with your hands)
Mushroom mixture...cooled a bit
2 T. chopped roasted red pepper (jarred is fine)
2/3 cup mozzarella flavored veggie shred “cheese”
¼ cup nutritional yeast
2/3 cup vegan cream cheese
½ tsp. red pepper flakes
¼ tsp. onion salt
½ tsp. kosher salt
1 tsp. dried basil or oregano
1 T. extra virgin olive oil

Mix thoroughly with large spoon, or better yet your hands. Chill the filling until the dough has risen.


Pre-heat oven to 350 degrees.

Take risen dough and cut in half. Cut in half again, so there are now 4 equal pieces of dough. Roll into balls.


Roll each ball of dough into an 8 or 9 inch circle. Take filling out of the refrigerator. Divide the filling into 4 equal portions. Roll the filling into a 6 inch log and place along the far end of the dough circle.


Now to form into a stollen shape….Take far end of circle (away from the filling) and fold over across the filling (baby).


Press dough around the filling. Then flip up the “tail” of the circle back across the stollen. 


Crimp the edges of the stollen to seal in and tuck the ends underneath.
The "babe wrapped in swaddling clothes" is now formed.
 Place all four of the stollen calzones on a baking sheet lined with parchment paper.


Bake the stollen calzones for 30 minutes in 350 degree oven.

Take out and brush stollen with earth balance vegan spread. Dust with some nutritional yeast, almond flour (finely ground almonds), oregano, kosher salt, and pepper.

Put stollen calzones back in the oven for 20 minutes more.


While the Christmas stollen calzones are finishing baking, prepare the marinara. Place the remainder of the jarred marinara into a pan to heat.
I always season up jarred sauce. If you make your own, disregard this portion.
If using jarred sauce ( use approximately 3 cups of sauce)

Add:
1 ½ tsp. of basil
1 ½ tsp. of oregano
2/3 cup wine
½ tsp. of red pepper flakes
¼ cup of natural sugar
Drizzle of olive oil

Allow to simmer on low while the stollen calzones are finishing.


When the stollen calzones are done remove from oven.


Gorgeous!!


Here is what the stollen calzones look like cut open!


Christmas colors for sure!

Serve with the spiced up marinara.


Eat this with a crisp salad and you will have a filling yummy meal!!!

All of this bread baking for Christmas??? Yes! Nothing says love like the smell of baking bread. The word yesterday was…LOVE. We lit the fourth advent candle and love was remembered in sooo many ways. 


We sang carols and lullabies in choir and I then remembered singing to my own babies....“You Are My Sunshine”. It’s easy to love our little babes, but the challenge comes loving those outside, or even inside our families that are not little babes. We speak of love, but how challenging it becomes to  DO LOVE when we don’t get our way. When things don’t go “according to OUR plans and expectations”…let’s face it…each of us gets in the way of real love happening. My wish for all of us this Christmas is that the sweet aroma of baking bread will remind us of the sweetness of LOVE. It truly is the answer for all of our life’s challenges. The word rolls off the tongue so easily, but we all know how difficult it really is to DO…right??? We all KNOW better than we DO! My prayer is that each of you this week will recognize and become aware of the ways that your selfless ways of showing love will influence the people and situations in YOUR LIFE and bring about a real Christmas in each of your celebrations. Really, being aware of this and DOING IT will be better than any wrapped gift under your tree. As you swaddle someone in love, I know love will rise within you...just like rising bread. As quoted from a sappy Christmas movie this week…"LOVE is the secret ingredient!" Add love to your recipes this week. There is always hope...always love....even when we cannot see it.

It’s been cold, but my knock out rose is the bush that never quits…little buds of hope! A little Christmas rose!


“Lo, how a rose e’er blooming from tender stem hath sprung,
Of Jesse’s lineage coming, by faithful prophets sung.
It came a floweret bright, amid the cold of winter,
When half spent was the night.”


Thoughtful living moment today: Love IS the miracle of Christmas, the sweet aroma when all respond…ahhhhhh, how sweet! Yes..bake some bread ...or swaddle a pug! 


MERRY CHRISTMAS TO ALL!!! And I LOVE YOU...Leslie :-)


Monday, December 12, 2011

The JOY of Mockingbird cake

Okay…so I just opened the number 12 on my Advent Calendar and the news said today was the busiest shipping day of the month. Thanks all of you who get our packages where we want them to be for Christmas, but I’ve been baking instead of shipping. Before I tell you about the recipe…here is how it came to be! Remember how I told you about how I walk everyday???? Well, since early Spring last year, my walking buddy and I have been watching a hawk that circles our neighborhood. It is a beautiful sight as it catches an air current and glides across the sky. It’s a red-tailed hawk that has a piercingly loud cry that has a descending pitch that is immediately recognizable. We always turn to one another and say, “Oh…there’s the hawk!” So, last week as we walked we heard the hawk. We stopped and looked up through the trees. The hawk cry was quite close…like right above our heads. We both searched, looking for this large beautiful bird. Nothing! We heard the cry again…no hawk, but again the hawk cry. Then, fluttering across the limb above me…a mockingbird. A mockingbird making the exact call of the red-tailed hawk AND WE LAUGHED, AND LAUGHED! What big sounds to come out of such small bird. Here’s one that visits my backyard. Sometimes I get the entire standup show with a rapid-fire string of all the sounds this little bird likes to imitate.


This same bird also does a mean cardinal imitation! One little female listens too!!


So last night, I needed a cake to take to our choir Christmas party and I thought…what would be a good Christmas cake to celebrate! I immediately thought…hummingbird….no…..pig pickin’…no….coconut, nothing says Christmas cake like coconut. And then it hit me! Mockingbird Cake will be the one I will make. I will do a little imitation of all THREE of these and make a cake that cries…CHRISTMAS!!!! Thanks to you little mockingbird for your inspiration and a new cake for Christmas!

Mockingbird Cake
Pre-heat oven to 350 degrees
Prep two 9 inch round cake pans as follows:
(for those who have asked how to line cake pans with paper easily)

Tear two sheets of wax paper the width of the pans. You can fold both sheets together and fold in half long wise and then bring ends together to create a square.


Fold square into a triangle two times creating an arrow shape.


Measure by holding the arrow of paper and from the center of pan to edge and using scissors, cut across the wide end of the arrow.


Unfold!


You now will have 2 circles that will fit the cake pans.


Spray the pans and place the wax paper in the bottom. Spray paper again and then dust pan and paper with unbleached all purpose flour.


Now, measure ½ cup of dried cranberries into a microwaveable bowl. Pour 1/3 cup of peach brandy on the cranberries and place in the microwave for 1minute. (You could certainly use orange juice, or apple juice…the peach brandy just adds another layer in the fruit flavors of the cake) Allow the dried cranberries to macerate while making the rest of cake.


Drain small can of mandarin oranges and save the juice.
(Get the oranges packed in pear juice or another juice, not heavy syrup.)
Finely chop enough of the well drained oranges to measure ¼ cup.


Sift the following dry ingredients into a large bowl:
3 cups unbleached all purpose flour
1 ½ cups natural granulated sugar
1 ½ tsp. baking powder
1 ½ tsp. baking soda
1 tsp. salt
1 tsp. cinnamon
½ tsp. all spice


Stir in 1 cup of finely chopped pecans and mix dry ingredients well.


Measure 3 tsp. of EnerG (dry egg replacer) and whisk in 4 T. of the juice from the drained mandarin oranges. Allow EnerG to fully dissolve while measuring the remaining ingredients.


Smash 1and ½ to 2 bananas (enough to measure ¾ cup)


Combine:
½ cup unsweetened applesauce (jarred or homemade)
1 (8 oz.) can of crushed pineapple do NOT drain
¾ cup smashed banana
¼ cup finely chopped mandarin orange segments
½ cup plumped dried cranberries (this includes any juice or brandy not absorbed by dried fruit…most all liquid will be absorbed)


Add fruit into bowl with dry ingredients.
Then add:
½ cup canola oil
½ cup almond milk
2 tsp. of pure vanilla

Stir well by hand…no need for a mixer with this cake. EASY!!!
Divide batter evenly between the two cake pans. Smooth top and place in the pre-heated 350 degree oven. I like to place the rack in the middle of the oven to bake cakes. Bake 25 to 30 minutes. The cake will be firm to touch in the center and a toothpick will come out cleanly. Allow the cakes to cool in the pan on a rack for 10 minutes. Then run a thin knife around the edge of the cake and invert onto a cooling rack. Peel off the wax paper from the cake bottom gently.


I have small square racks that allow me to then right the cake so the top of the cake is up and the bottom is against the cooling rack.


You can ice the cake the same day that you make it, but I prefer to allow the cake to cool completely, then wrap it well in film wrap and then ice it the next day. The important thing is to allow the cake to COOL COMPLETELY before icing.

While cake is cooling I make the garnishes for the cake. I sugared some fresh cranberries and fresh rosemary. I picked some rosemary out in the garden…it is feeling like December, but this hearty herb is as green as ever. I just love having my fresh rosemary and thyme when the other herbs have died out from the cold.


The other bit of joy comes in seeing the camellia’s blooming. How lucky are we to have beautiful flowers in spite of the chilly temperatures.


Joy!


So I took the fresh rosemary and coated it in some of the EnerG dissolved in water like it was egg white. I then sugared the rosemary with some natural sugar and allowed it to dry. I did the same for the cranberries only I used some colored sugar I had in the cupboard.


It looks just like a snowy Christmas card when complete!


But back to Icing the cake…..


Icing Recipe:
I always make more icing than I need. I cannot stand barely having enough icing and making it stretch to ice the cake properly. You will have enough to put on additional cupcakes during your holiday baking. Just put leftover icing into a container and keep it in the refrigerator.

2 sticks of Earth Balance (room temperature)
8 oz. of vegan cream cheese (room temperature)
(Allowing the earth balance and vegan cream cheese to come to room temperature allows it to be creamed more easily and smoothly!!!!)
Zest of 1 medium size orange
Juice of ½ of the orange
2 tsp. of pure vanilla
2 lbs. of confection powdered sugar

Cream the earth balance and vegan cream cheese with a mixer until smooth. Add zest, juice, and vanilla. Slowly add the powdered sugar, scraping down the sides of the bowl and mixing until smooth and the spreading consistency you like. It may not take all of the sugar or it might take a bit more – it’s all about the day!! I like the frosting a bit stiffer so it is easy to spread, but loose enough to be fluffy.

Now take cooled cake, either fresh or next day after being wrapped, and level it with a thin, serrated knife. This cake is very level, but I like to take off a VERY THIN layer from the top of all cakes. I then place the first cake layer on the cake plate and slide strips of wax paper under the bottom edge of the cake. (It takes 4 strips) Do the same leveling to the second layer.


Put several large spoonfuls of icing onto the first layer, and carefully spread icing from the center to not quite the edge of the cake. When placing the second layer of cake on the filling, it will squish to the edge. The amount of icing depends totally on how much icing you like. I like about ¼ of an inch, but again it is up to your preference when eating cake. Now top the icing with the second layer of cake.


Ice the sides of the cake first. This cake is so moist and because it has a denser texture (like a carrot cake) a crumb, skim coat of icing to hold the cake crumbs in place is not necessary. Just carefully ice the sides using an off-set spatula.


Then Ice the top and smooth the icing on top and sides again. It does not have to be perfectly smooth.


BECAUSE….coconut snow is now going over all the icing. Just carefully pat it all over. I place the cake plate on a baking sheet to catch any wayward coconut so I can easily scoop it up and use it for the next sprinkle of coconut. Continue until all the icing is covered with coconut flakes!


Now using a knife, carefully push the knife against the bottom edge of the cake and pull out the wax paper that is protecting the plate from being covered in icing and coconut. Continue until all four pieces are out and you have a clean edge. I use the knife to push everything back in place. I piped an edge around the bottom of the cake, but it is just fine to leave it as is…totally up to whether you like to pipe icing. Just takes a little practice with the bag and piping tips and gives the cake a finished look. Add the sugared cranberries and rosemary made earlier.
I placed some around the bottom….


And some on top…..


Oh….what a little mimicker mockingbird cake…hehe!!!


Don’t you just LOVE cake!!! We love cake here in the South, especially at Christmas. It brings joy to the party…it just does! Which brings me to my word this week, JOY! Yes, the third candle we lit yesterday on our Advent wreath was the pink candle…the JOY candle.


Like peace, joy has nothing really to do with life circumstances. Joy is a gift that is within…it is this byproduct produced from just fully enjoying the moment. Don’t you find that when you truly enjoy something like a beautiful song – joy just wells up from within you??? That so happened while the choir was singing yesterday. A beautiful, college student sits next to me in choir. We were singing, “Joy to the World”. The organ was full, and the brass was soaring. Our voices joined in this grand final phrase, “And wonders of His love” and Allison whispered, “NOW, it’s Christmas!” Thankfully, it isn’t quite, but I fully understood that feeling. This young woman’s finals were over, she was about to go back to her hometown and be with family.  The swelling experience that surrounded us up in that choir loft can only be described as pure JOY. We were taking in and enjoying that moment. Joy came like a wave over, and around, and within us! Everyone was smiling. Joy is a way of experiencing life. Joy is seeing the glass ½ full, looking at the silver lining, not giving into despair. Joy makes smiles spontaneously appear. Like what happened when we were trying to get the pugs to dress up in their Santa hats.


Hope’s eventually became a beard.


So I smile and laugh! I am so filled with joy, even from two little Santa pugs.

When I woke up this morning…the full moon was just going down and the pink ribbons of a new day were woven across the sky. A new day! 


I took the picture and then looked at the rocking chair on the front porch...the pillow says, JOY!!!!!
Like I’ve said…you can always find a sign. You only must stop and look!


Look for joy this week! Eat cake and take in some JOY!!


Thoughtful living moment today: Take in all of life and enjoy each moment…it is there…deep within you...that joy will be born!